Important Note: Due to some operational issues it is VERY important that you have the latest firmware on your Linksys router. Please go to the Linksys Download Website and ensure you have the newest firmware.
Configuration of a Linksys router depends on the type of broadband service and other equipment connected. This is a generalized Linksys Router FAQ and some firmware, capabilities, and actual screen shots may vary. This initial setup is all that is needed to configure and connect your Linksys based network for FastAccess. Any additional setup for features like WEP, DHCP IP ranges, port triggering, etc is out of the scope of this FAQ. Other FAQs may be more appropriate and provide more specific information:
•If you are using a BellSouth supplied Westell 2100/2200/6100 modem please reference the FAQ here.
•If you are using a BellSouth supplied Motorola/Netopia 2210 modem please reference the FAQ here.
•If you here IFITL (PCData) service please reference the FAQ here.
•Both the modem and router must be reset to default.
•The BellSouth Installation CD and Connection Manager are not required to use this configuration.
•Since BellSouth assigns static IPs via your username the configurations shown are applicable to both dynamic and single static IP customers.
• You will be using the PPPoE client built into the Linksys router for connectivity/authentication. Please delete any other unused PPP clients like Enternet300, RASPPP, or the native XP client.
 Step 1
Verify that your NIC card is set to "Obtain IP Address Automatically". Power down the router and any PCs. Connect one of the router's LAN ports to the computer NIC and power up the router and then the computer. Reset the router to default by pressing the reset button for roughly 25 seconds (exact placement of the button differs per model).

 Step 2
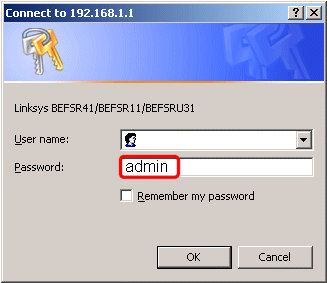
Important note: The following screen shots are based on a Linksys BEFSR41v.2 router and your screen shots may be different, however the process and configurations are the same. Open a browser session and enter 192.168.1.1 in the address field to access the Linksys Interface. At the Username and Password prompt enter admin (without quotes) in the Password Field.

 Step 3
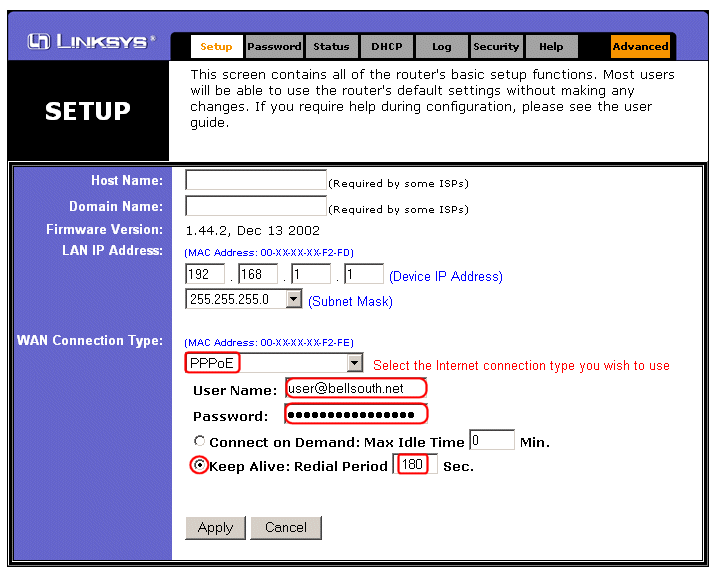
On the Linksys Setup page select PPPoE from the WAN Connection Type pull down. Enter your BellSouth Username followed by "@bellsouth.net". Enter your BellSouth Password. Select Keep Alive and enter 180 seconds Redial Period field. Do not enter anything in the Host Name or Domain Name fields. If your model has the ability to adjust MTU size (not shown below) select Enable or Manual and enter 1492 in the Size field. Click on Apply to save the changes. You may get a "Settings are successful" message, click on Continue (if required).

 Step 4
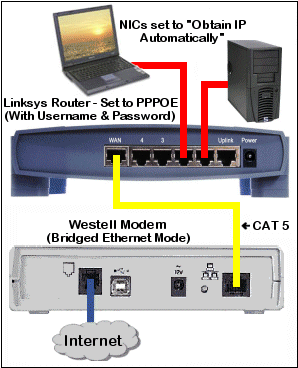
Power everything down and physically connect the modem, the router, and any computer(s).

Westell 2100 shown. Pictures by Andy Houtz
 Step 5
Power up the network equipment in this order:
•
Westell or Motorola Modem (wait for DSL synch)
•Linksys Router
•Computer(s)
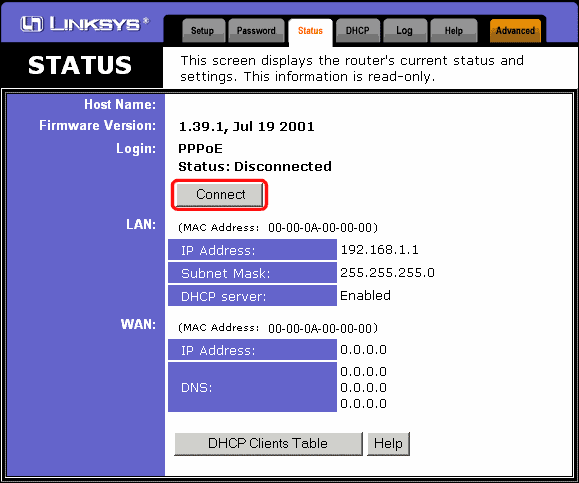
•Open a browser session and enter "192.168.1.1" in the address field to access the Linksys Interface. Click on the Status tab from the menu then click on the Connect button to connect to the Internet.
•Go surfing!

 Important Additional Information
•The Westell 6100 and Motorola 2210 modems have an "Internet" light that is green whenever there is an active PPPoE session initiated by the Westell. Since you are using the Linksys to establish the PPPoE session the light will stay off. This is normal.
• Do not change the Linksys Operating Mode from Gateway Mode (default setting) to Router Mode, or it will not function correctly.
•The Linksys "Auto" MTU capability does not function correctly on some models/firmware. You should manually enable the MTU and adjust the size to 1492 (or less).
•You should check your tweak settings to optimize your new network. Reminder: If you change your MTU, make sure that it is set identically on all equipment (PCs and routers) in the network.
Credit to: http://www.dslreports.com/faq/6890


0 Your Comments